Creating Mail-Enabled Microsoft 365 Security Groups
If you’ve ever tried to create a mail-enabled security group directly from the Entra Admin Center and couldn’t find the option — you’re not alone. This guide explains what mail-enabled security groups are, why you can’t create them in Entra, and the correct ways to create them using Microsoft 365 tools and Exchange PowerShell. Let’s break it down step by step.
What are Mail-Enabled Microsoft 365 Security Groups?
A Mail-Enabled Security Group is a special type of group that combines:
- ✅ Security capabilities (used for permissions and access control)
- ✅ Email distribution capabilities (used for sending emails to multiple users)
In simple terms: It’s a security group that also has an email address.
What can you use it for?
- Granting access to SharePoint sites, file shares, or applications
- Assigning Azure roles or permissions
- Sending email notifications to all members at once
- Managing departmental access (HR, Finance, IT, etc.)
Why Entra Admin Center Does Not Support Creation of Mail-Enabled Security Groups?
This is one of the most common points of confusion. In the Entra Admin Center, the group types available are typically:
- Security (used for access control, app assignment, etc.)
- Microsoft 365 (collaboration groups with Teams/SharePoint integration)
- Dynamic versions of the above (based on rules)
You will not see an option for MailEnabledSecurity.
Why?
Because:
- The MailEnabledSecurity option is not exposed in Entra
- Entra focuses on identity and access management, not mail routing
- Mail-enabled security groups are primarily an Exchange construct
- They require Exchange Online to provision:
- Mail attributes
- SMTP address
- Distribution capabilities
In short: Entra handles identity, Exchange handles mail.
Since mail-enabled security groups require Exchange mail properties, they must be created through Exchange-aware tools.
How to Create Mail-Enabled Microsoft 365 Security Groups
There are three supported methods:
- Using Microsoft 365 Admin Portal
- Using Exchange Admin Center
- Using Exchange PowerShell
Let’s go through each one.
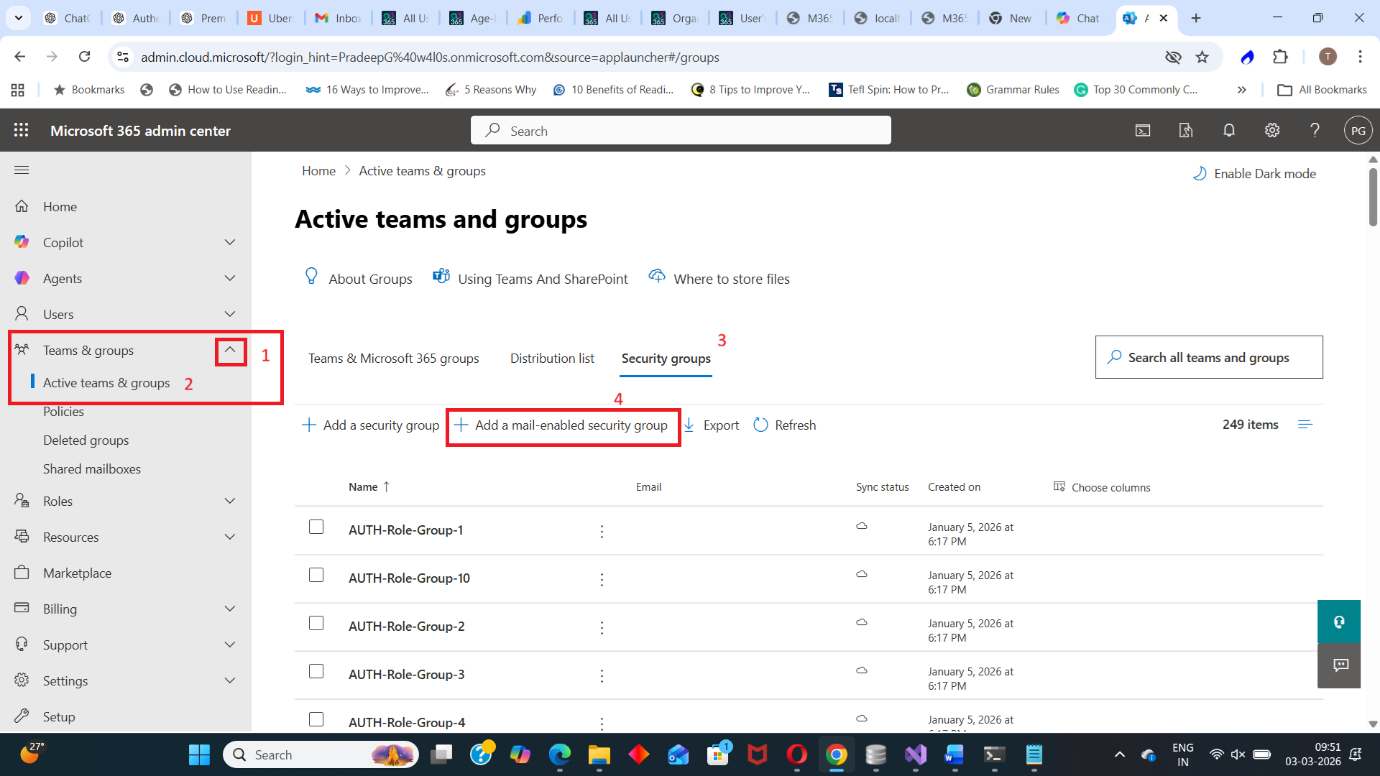
Method 1: Using Microsoft 365 Admin Portal
Steps:
- Go to:
👉https://admin.microsoft.com - Navigate to:
Teams & groups → Active teams & groups - Click Security
- Click Security groups → Add a mail-enabled security group
- Provide:
- Group Name
- Description
- Add Owners
- Add Members
- Provide Email address (this makes it mail-enabled)
- Click Create group
Once created, the group will:
- Function as a security group
- Have an SMTP address
- Be usable for permissions and mail routing
Method 2: Using Exchange Admin Center (Recommended for Admins)
This is the most reliable GUI method.
Steps:
- Go to:
👉https://admin.exchange.microsoft.com - Navigate to: Recipients → Groups and select Mail-enabled security
- Click Add a Group → Select Mail-enabled security → Click Next
- Enter: Name and Description
- Add Owners
- Add Members
- Provide Email Address.
- Review settings and click Create
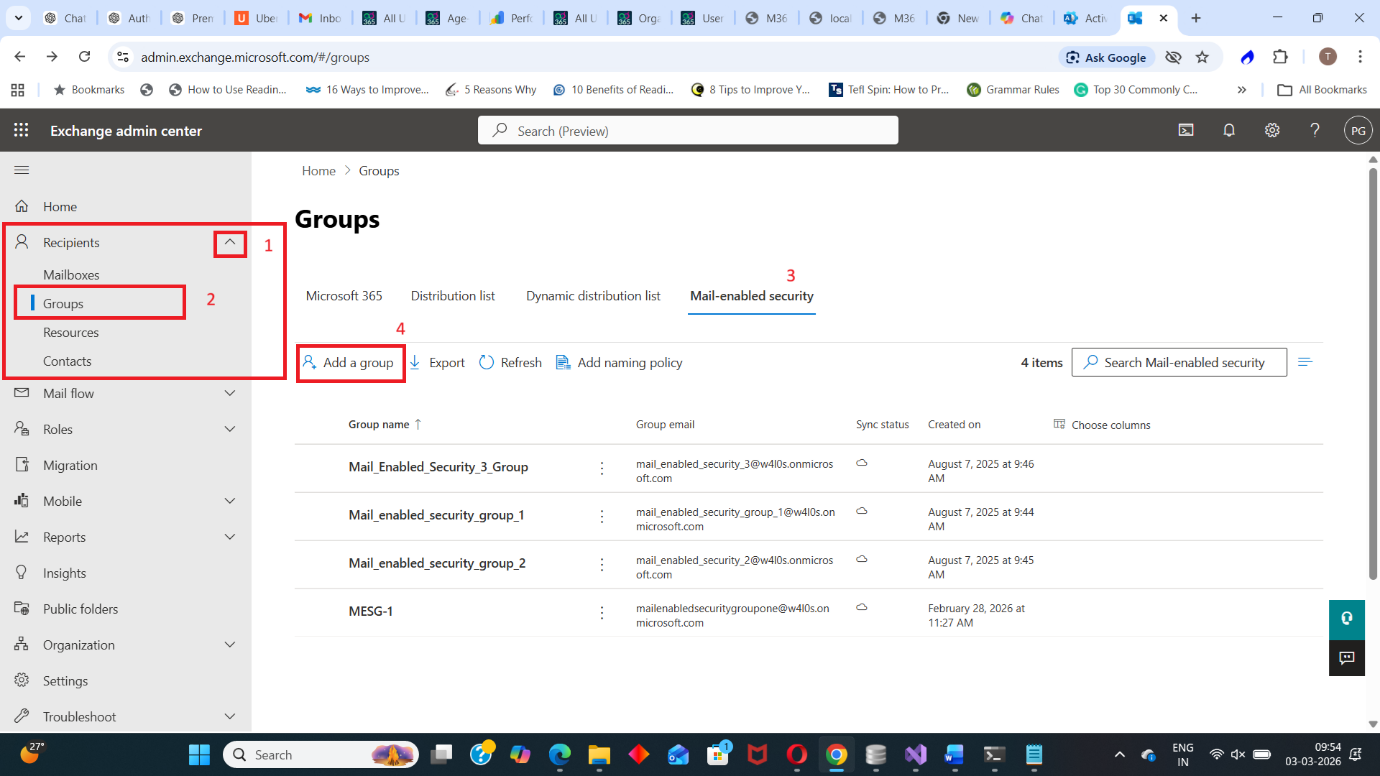
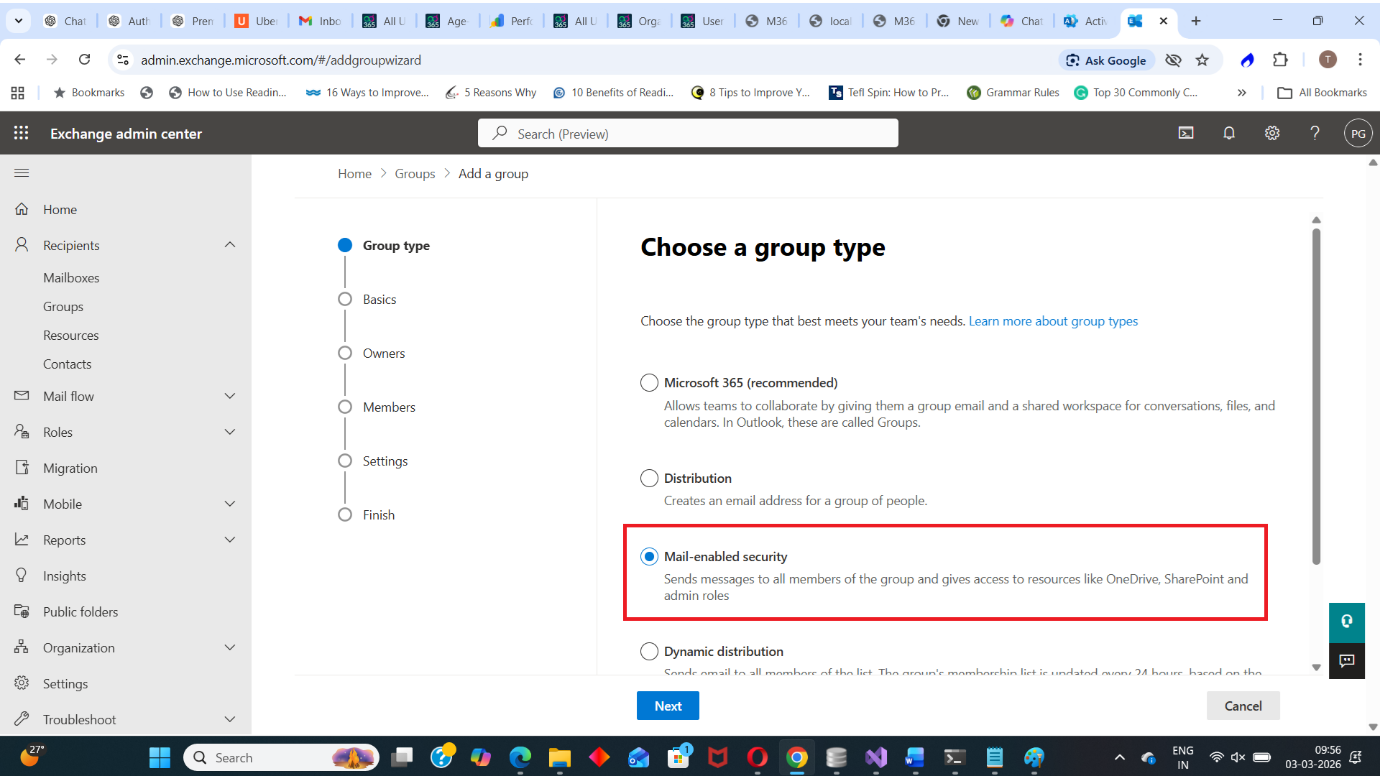
This ensures Exchange provisions all required mail attributes properly.
Method 3: Using Exchange PowerShell (Most Flexible & Scalable)
PowerShell is the preferred method for:
- Automation
- Bulk creation
- Standardized provisioning
- Enterprise deployments
Creating Mail-Enabled Security Groups Individually
Use the following script exactly as shown:
$Owners = @('owner1@domain.com', 'owner2@domain.com')
$Members = @('member1@domain.com', 'member2@domain.com')
New-DistributionGroup -Name "HR Department" -Alias "hrdepartment" -Type "Security"
-ManagedBy $Owners -Members $Members
What this does:
- Creates a new group named HR Department
- Assigns alias hrdepartment
- Sets group type to Security
- Assigns owners
- Adds members
- Automatically provisions mail attributes
This is the cleanest way to create a mail-enabled security group.
Bulk Create Mail-Enabled Security Groups
If you're deploying multiple groups (departments, regions, projects), bulk creation saves massive time.
Use the script below exactly as provided:
# Import the CSV file
$groups = Import-Csv -Path "MailEnabledSecurityGroups.csv"

# Create each mail-enabled security group
foreach ($group in $groups) {
    try {
        New-DistributionGroup -Name $group.Name `
        -Alias $group.Alias `
        -PrimarySmtpAddress "$($group.Alias)@7xh7fj.onmicrosoft.com" `
        -Type Security

        Write-Host "✅ Created: $($group.Name)" -ForegroundColor Green
    } catch {
        Write-Host "❌ Failed: $($group.Name)" -ForegroundColor Red
        Write-Host $_.Exception.Message
    }
}
Sample CSV Structure (MailEnabledSecurityGroups.csv)
Name,Alias
HR Department,hrdepartment
Finance Team,financeteam
IT Support,itsupport
What this script does:
- Imports group details from CSV
- Creates each mail-enabled security group
- Assigns primary SMTP address
- Handles errors gracefully
- Displays success/failure messages
This is ideal for tenant migrations, mergers, or standardized deployment.
Final Thoughts
Mail-enabled security groups are incredibly powerful because they bridge:
- Identity & access control
- Email distribution
However, they cannot be created directly in Entra because:
- Entra manages identity
- Exchange manages mail routing
- Mail-enabled security groups require Exchange provisioning
If you're creating:
- A single group → Use Exchange Admin Center
- Multiple groups → Use PowerShell
- Standard admin tasks → Microsoft 365 Admin Portal works fine
Did You Know? Managing Microsoft 365 applications is even easier with automation. Try our Graph PowerShell scripts to automate tasks like generating reports, cleaning up inactive Teams, or assigning licenses efficiently.
Ready to get the most out of Microsoft 365 tools? Explore our free Microsoft 365 administration tools to simplify your administrative tasks and boost productivity.