🔧 New: User Management Graph PowerShell Toolkit
Simplify user tasks like bulk creation, updates, password resets, deletions, license checks & more — all from one place.
🚀 Launch ToolkitHow to Create Mail Flow Using Microsoft Exchange Online From Scratch
Note: Graph PowerShell does not yet efficiently support org wide mailbox management. Using New-MgUserMailFolderMessageRule would mean you should loop each and every user for the inbox rule to be applied, which is good for development purposes, but not for efficient Microsoft 365 administration.
Previously, we saw how mail flow rules can be created using in-built pre-defined templates. Now let’s understand how to create Microsoft Exchange mail flow rules from scratch using Exchange Admin Center and Exchange Online PowerShell .
Prerequisites
You need to have either a global administrator role or Exchange administrator role.
Use Case 1: Forwarding Messages to a Manager (or Someone Else) for Approval
You will need a rule like this, for example, to moderate or monitor emails from an employee about to resign, from a trainee or someone who occupies a business-critical position but is new to your work environment, and similar scenarios. This rule forwards all the emails from the marked employee to a designated moderator who can then choose to either accept or reject the mail. The mail will only go through if the moderator approves it. Otherwise, the sender gets an email-declined notification.
Note: The predefined rule Send messages to a moderator also helps you create the same rule that we are about to configure. The reason for guiding you to create the same rule from the ground up is to explain how to create a mail flow rule from scratch.
Note: The sender is set as an individual for demo purposes. Rules like this are usually applied to a group of individuals on a group membership basis.
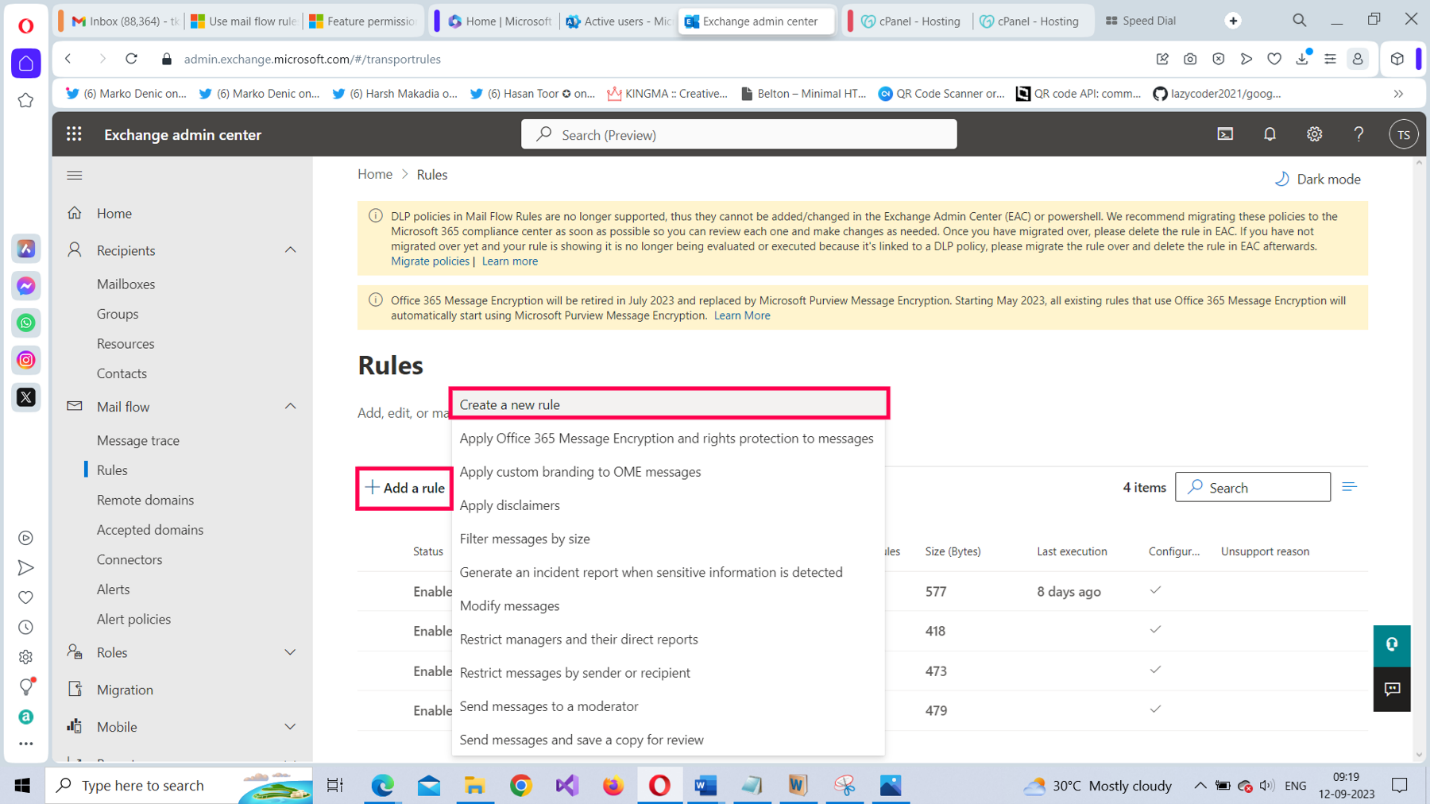
Once you are on the mail flow Rules page of the Exchange admin center (EAC), do the following:
Select Add a rule > Create a new rule, as shown in Figure 2.
The New transport rule pane opens, as shown in Figure 3.
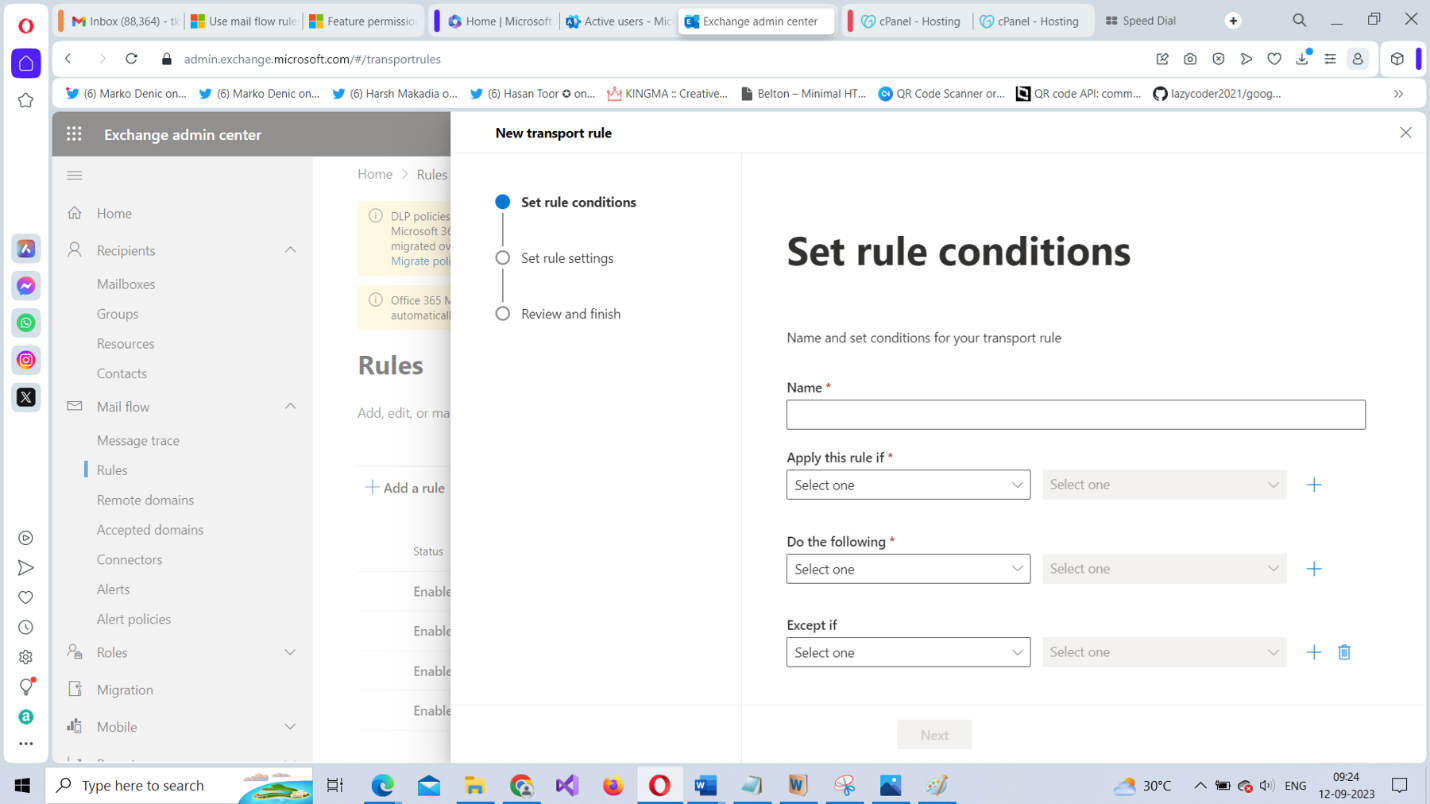
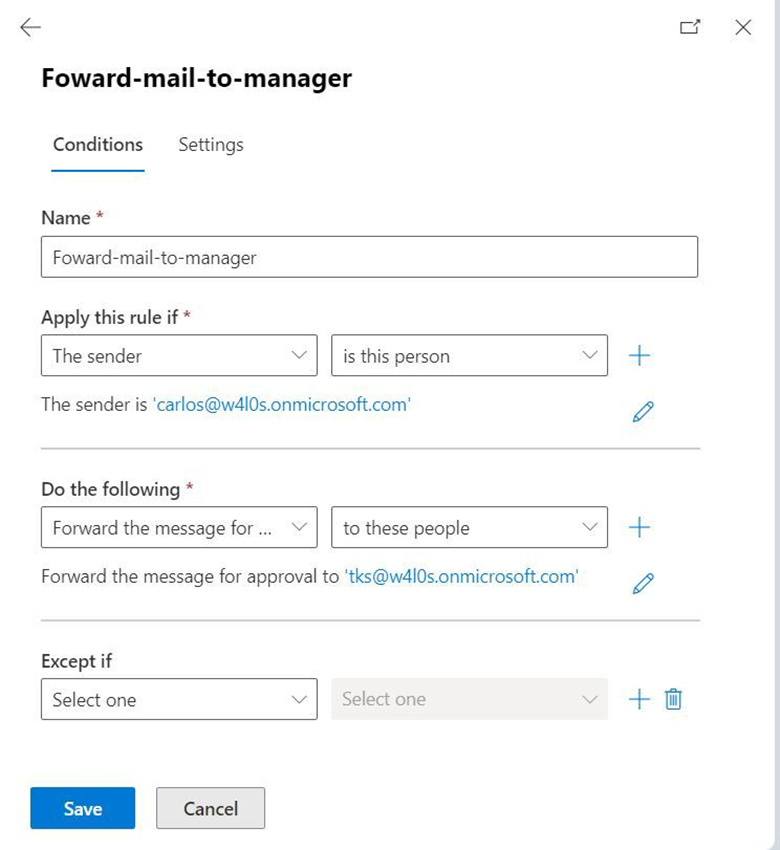
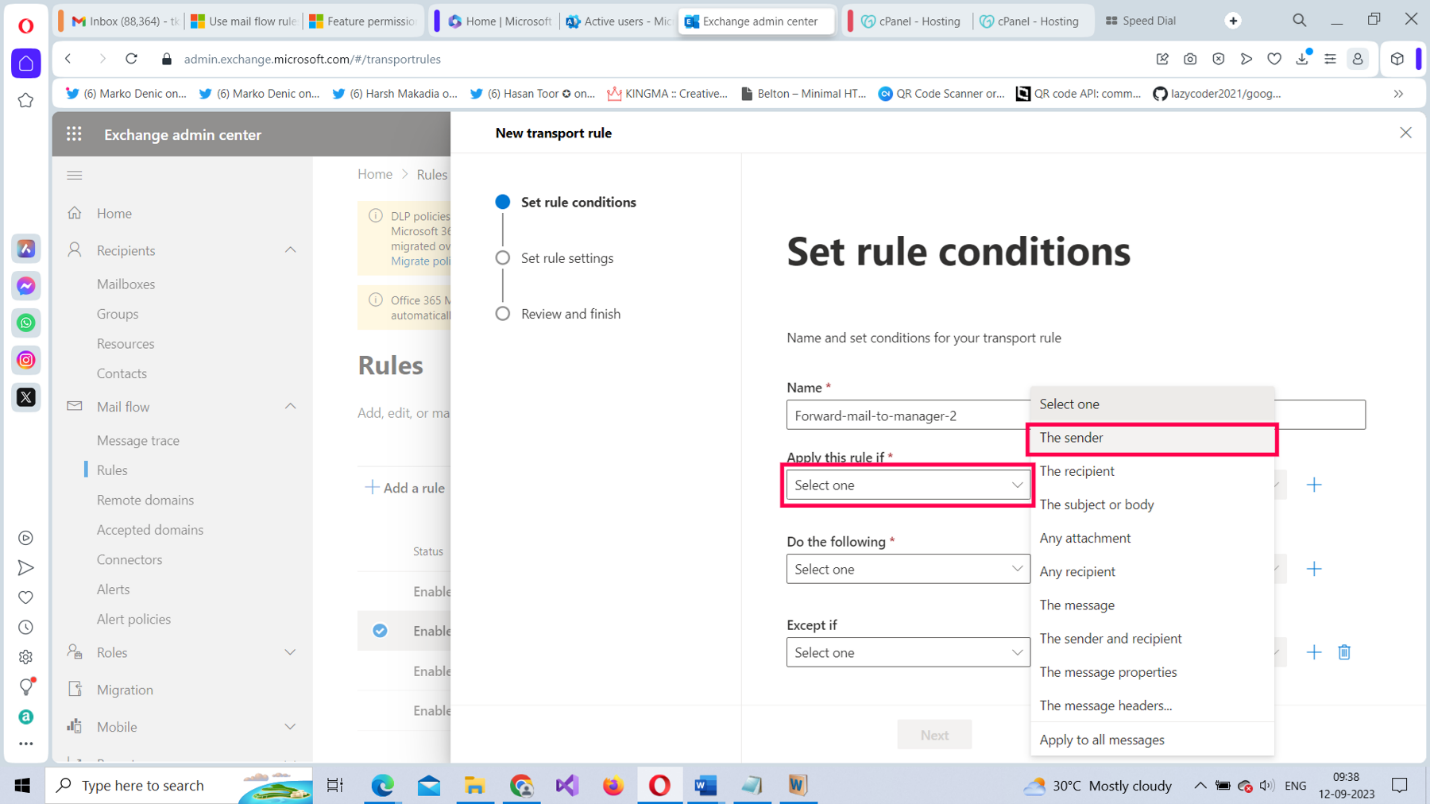
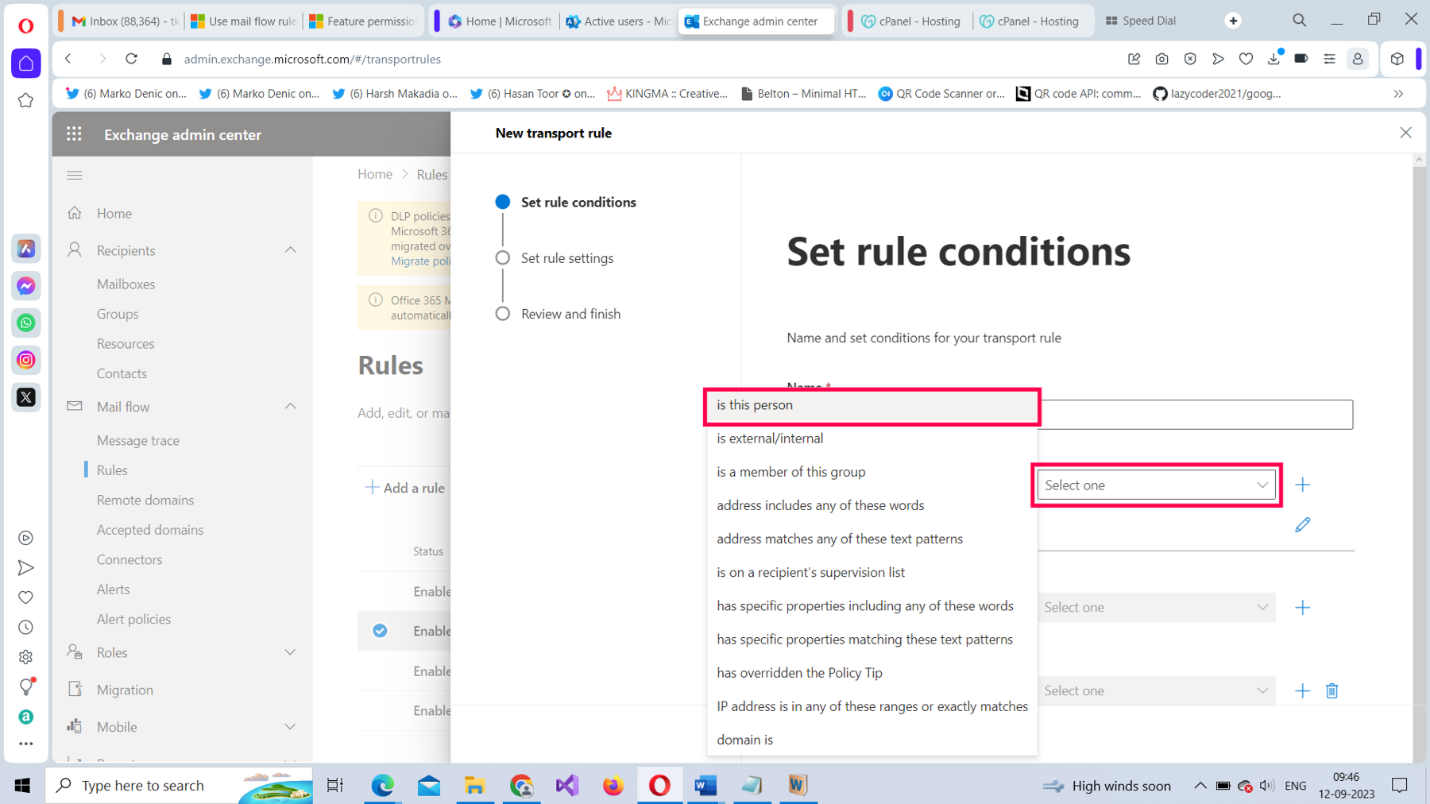
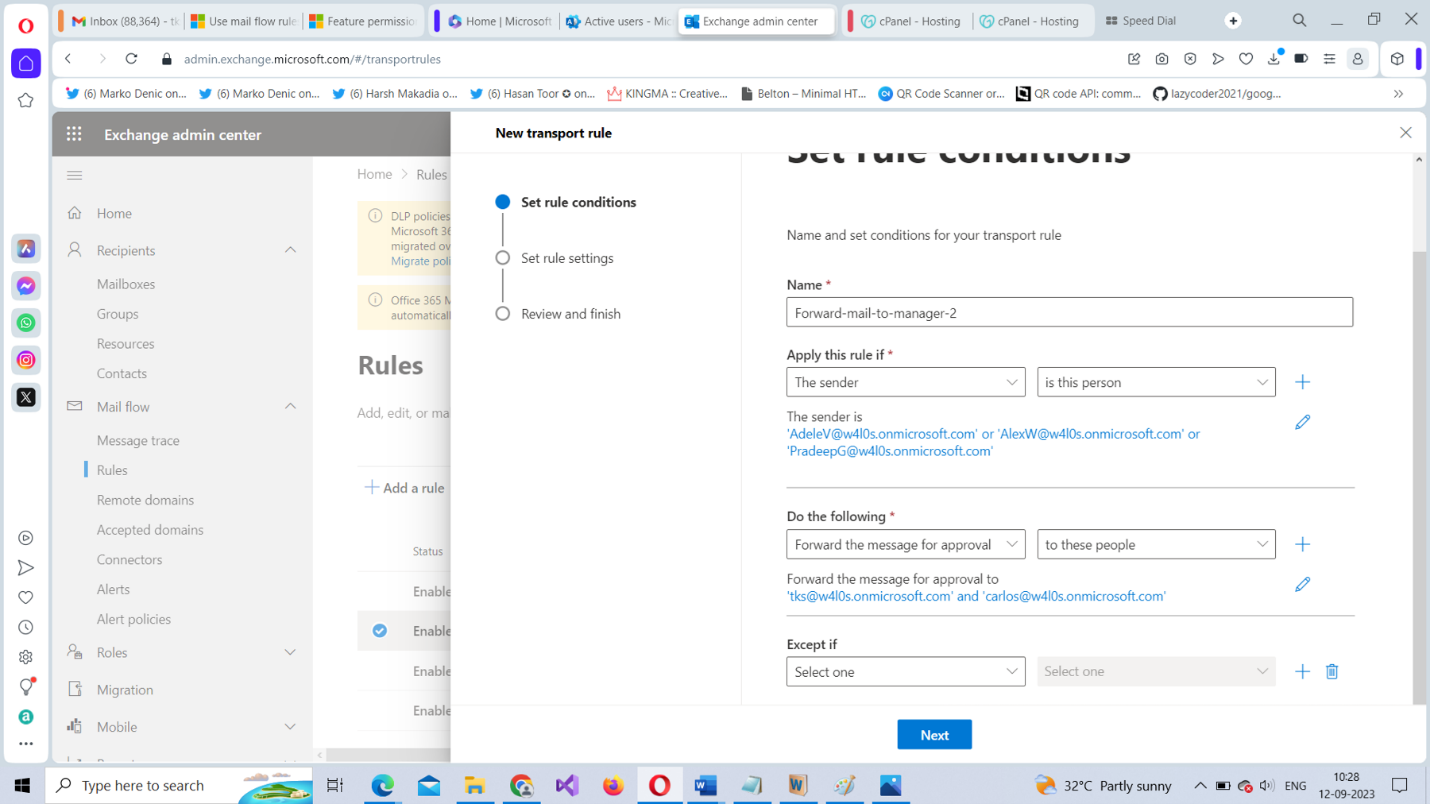
Provide a name for the rule such as Forward-mail-to-manager. Ensure that you don’t leave any whitespace between when naming the rule. From the Apply this rule if dropdown, select The sender, as shown in Figure 4.
From the Select One dropdown, select the is this person option, as shown in Figure 5.
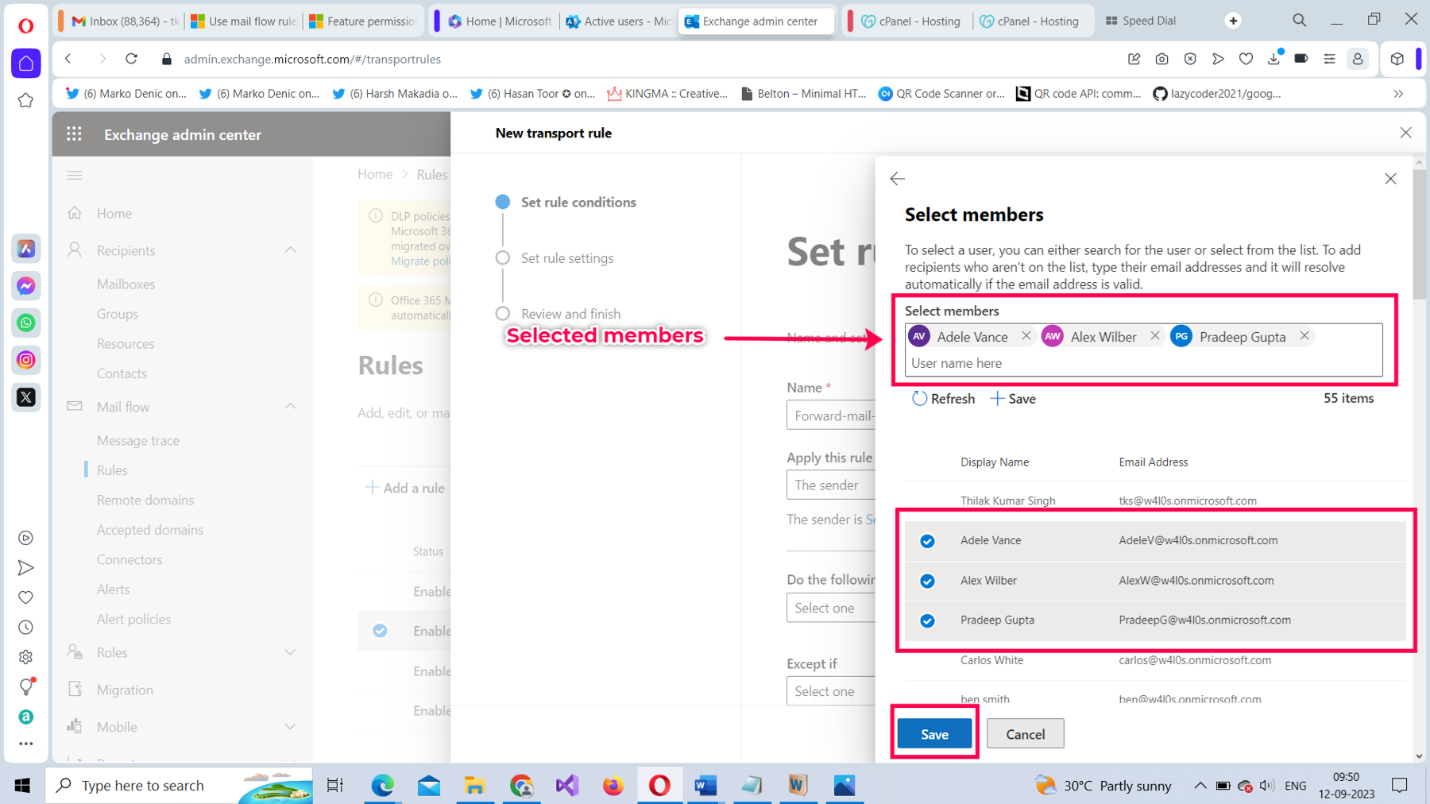
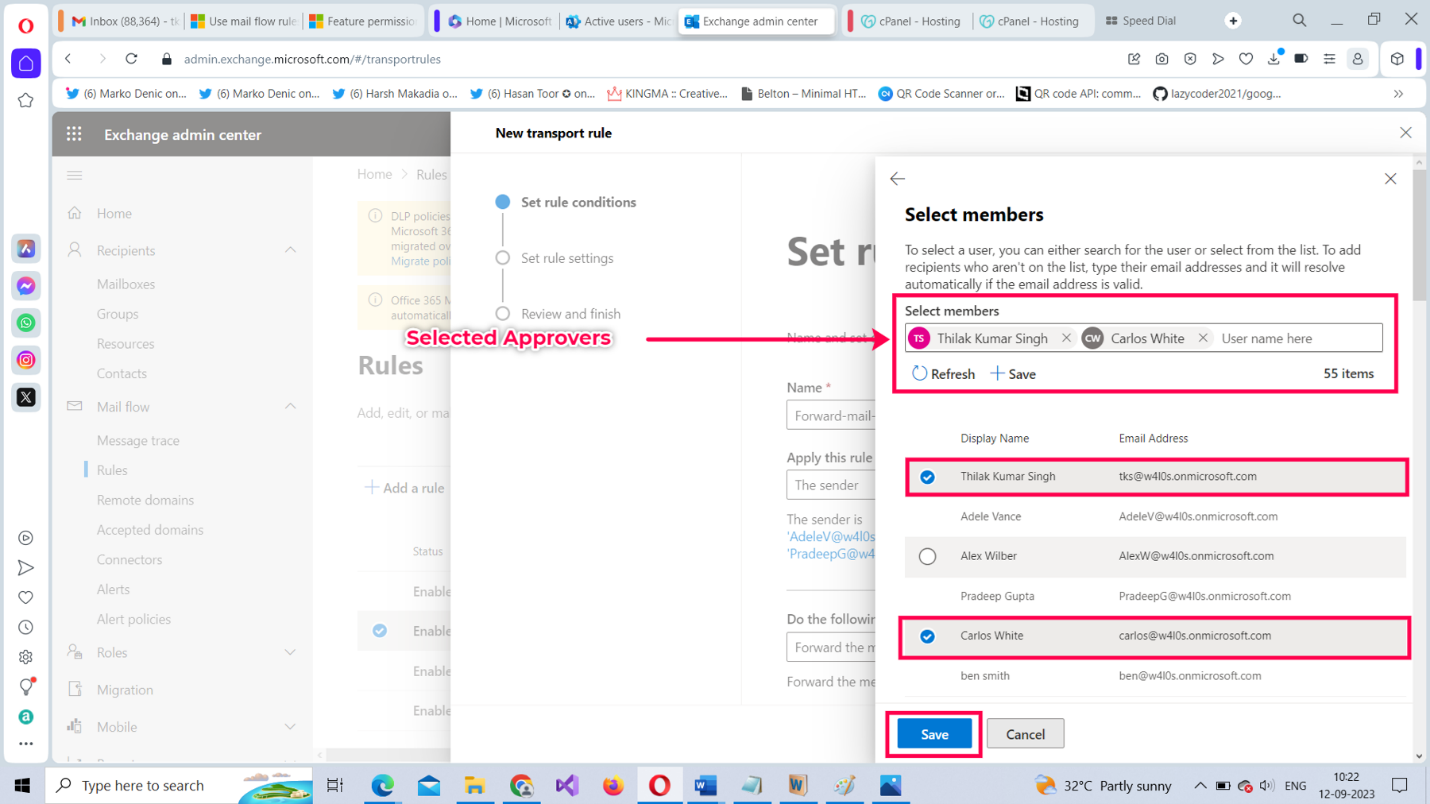
The Select members pane opens. Select the users to whom this rule is going to apply and select Save, as shown in Figure 6.
Your rule pane should look like the one shown in Figure 7 now.

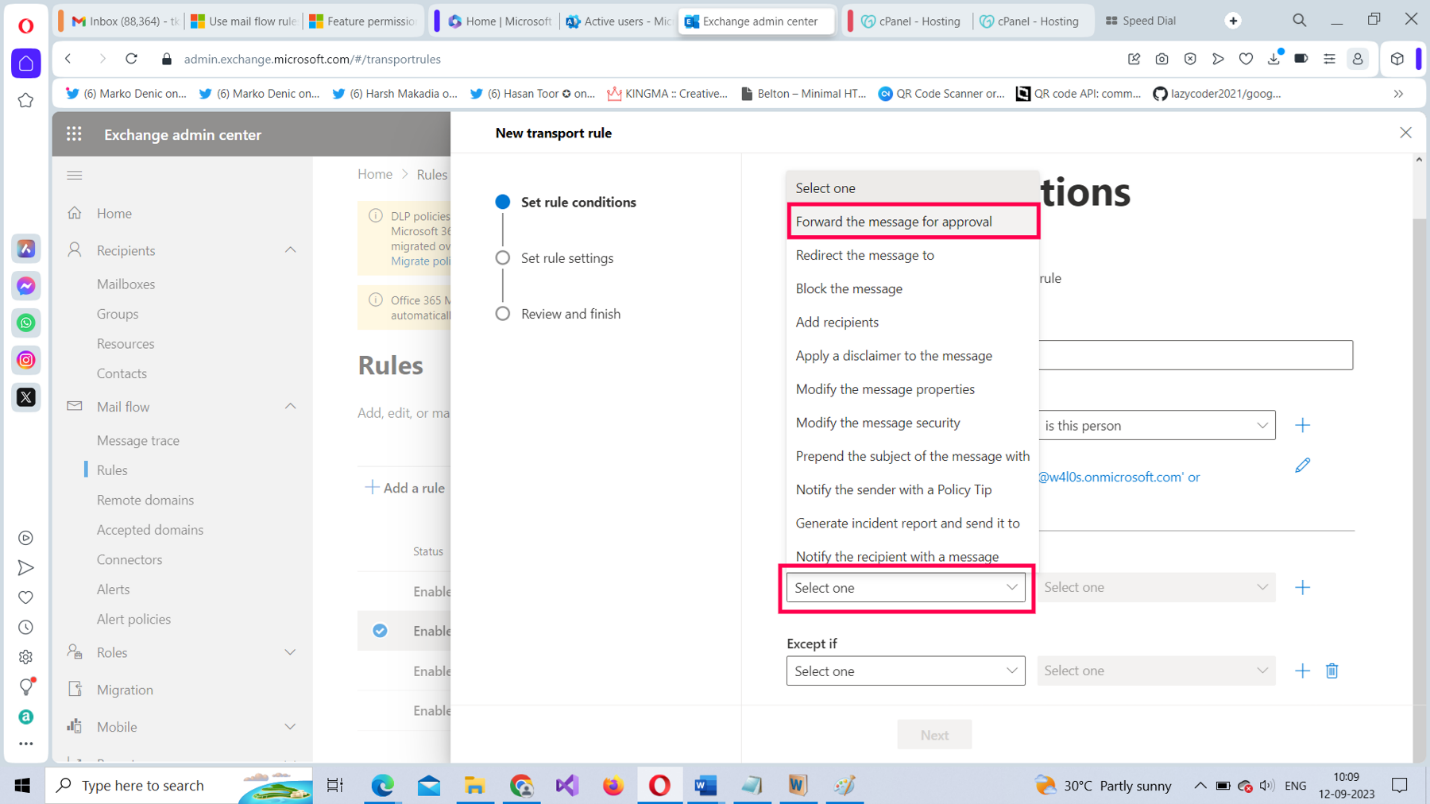
From the Do the following dropdown, select Forward the message for approval, as shown in Figure 8.
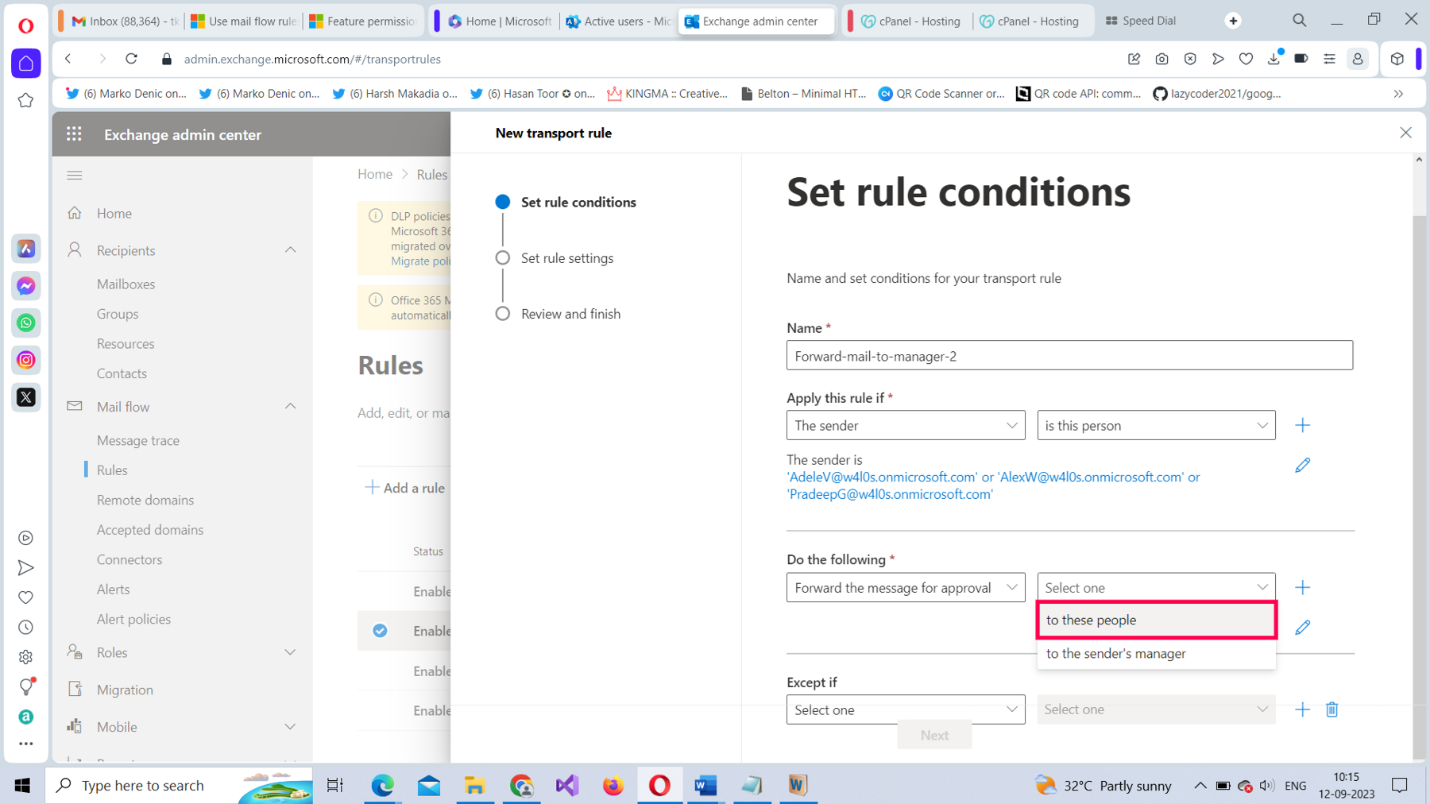
From the Select one dropdown, select to these people, as shown in Figure 9.
Note: You can also select to the sender’s manager if you have already marked the senders to their respective managers in your system.
The Select members pane opens. Select the users responsible for approving the sender’s message, and then select Save, as shown in Figure 10.
Your rule pane should look like the one shown in Figure 11.
To proceed further, select Save, since we are not going to set any exceptions for this rule.
The rule settings pane opens, as shown in Figure 12. We will configure the rule settings with the bare minimum requirements for now.
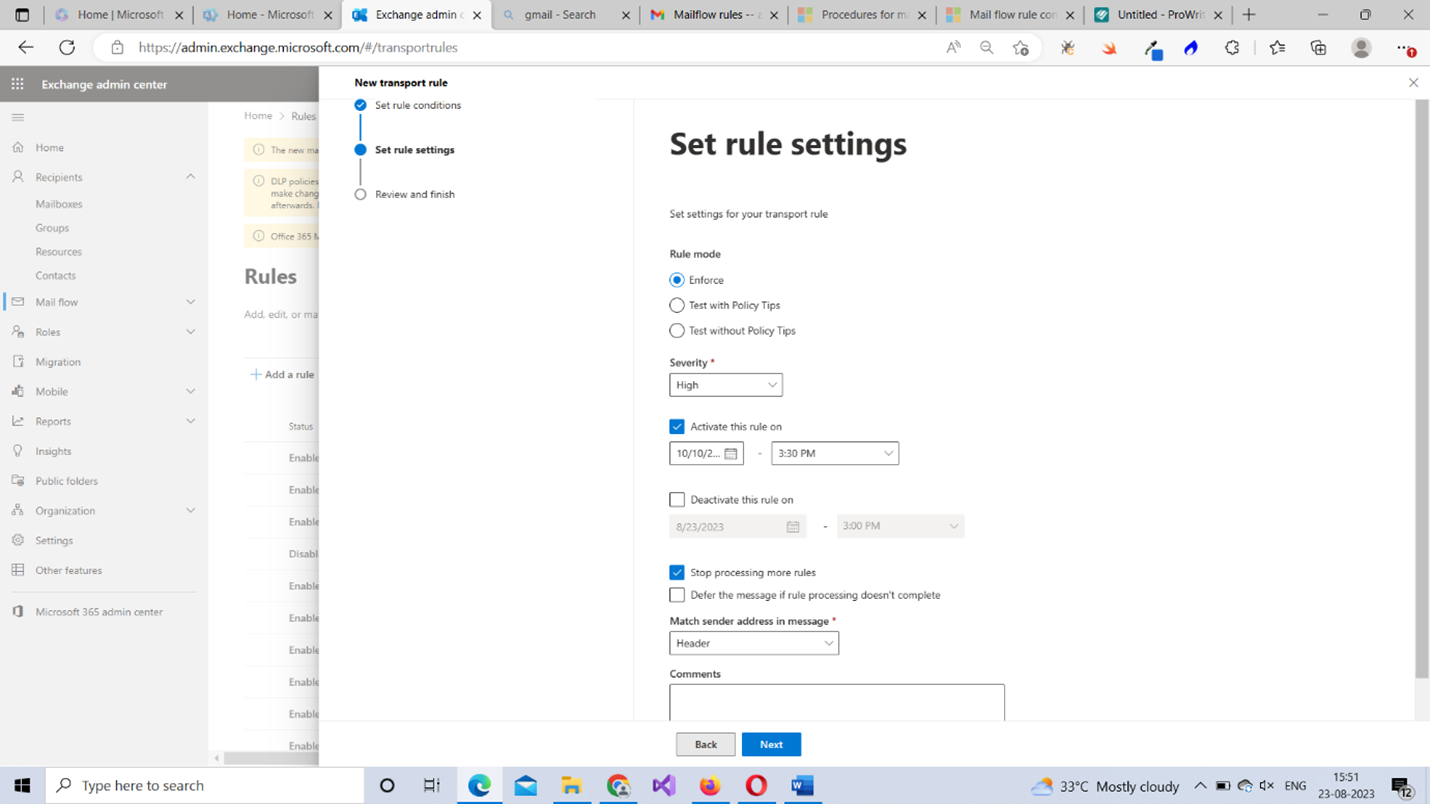
Set the rule mode. You have three different options:
- Enforce: This enforces the rule immediately.
- Test with Policy Tips: Test runs the rule with policy tips.
- Test without Policy Tips: Test runs the rule without policy tips.
Note: Since this is a demo lesson, we are going to enforce the rule without any testing. Please note that this is not recommended for practical deployment.
Set the severity for the rule. You have five options:
- Low: For rules that demand low priority.
- Medium: For rules that demand medium priority.
- High: For rules that demand high priority.
- Not audit: For rules that you don’t want to audit.
- Not specified: For rules that don’t demand any kind of priority.
Note: Remember that rules with high priority are run first. So, let’s give our rule a “high” priority.
- Enable the Activate this rule on checkbox, and then select the date and time at which the rule gets enforced.
Note: You also have the option of deactivating a rule by specifying a date and time for it.
- Enable the Stop processing more rules checkbox for now. This ensures the rules that follow are ignored. Whether to enable/disable this rule depends on how important the rule is that you are configuring. To proceed to the Review and Finish section, select Next.
Note: Leave the Match sender address in message as Header for now. You don’t have to worry about this.
- After reviewing your newly configured mail flow rule and confirming everything is right, select Finish. The mail flow or transport rule gets created successfully. To close the pane, select Done.
Testing Whether the Mail Flow Rule Works
To test whether the configured mail flow rule works:
Sign in with one of the sender accounts (those you added as senders in the mail flow rule) and send a mail using Outlook on the web. You will notice that the message gets listed in the Sent Items folder.
Now sign out and sign in as one of the approver accounts (those you added in the Forward the message for approval to list). The mail that you just sent using the sender account will be available in the inbox, as shown in Figure 13.
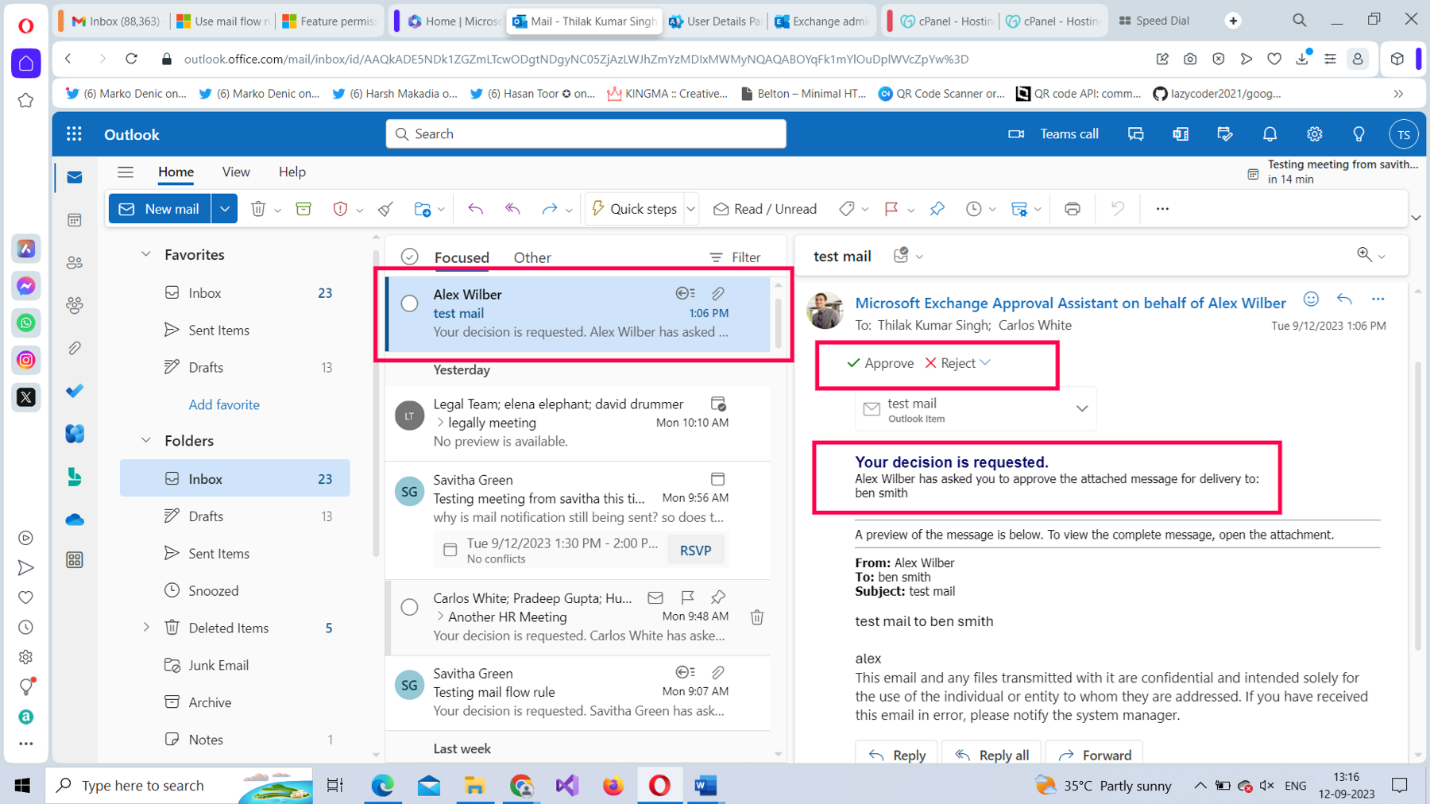
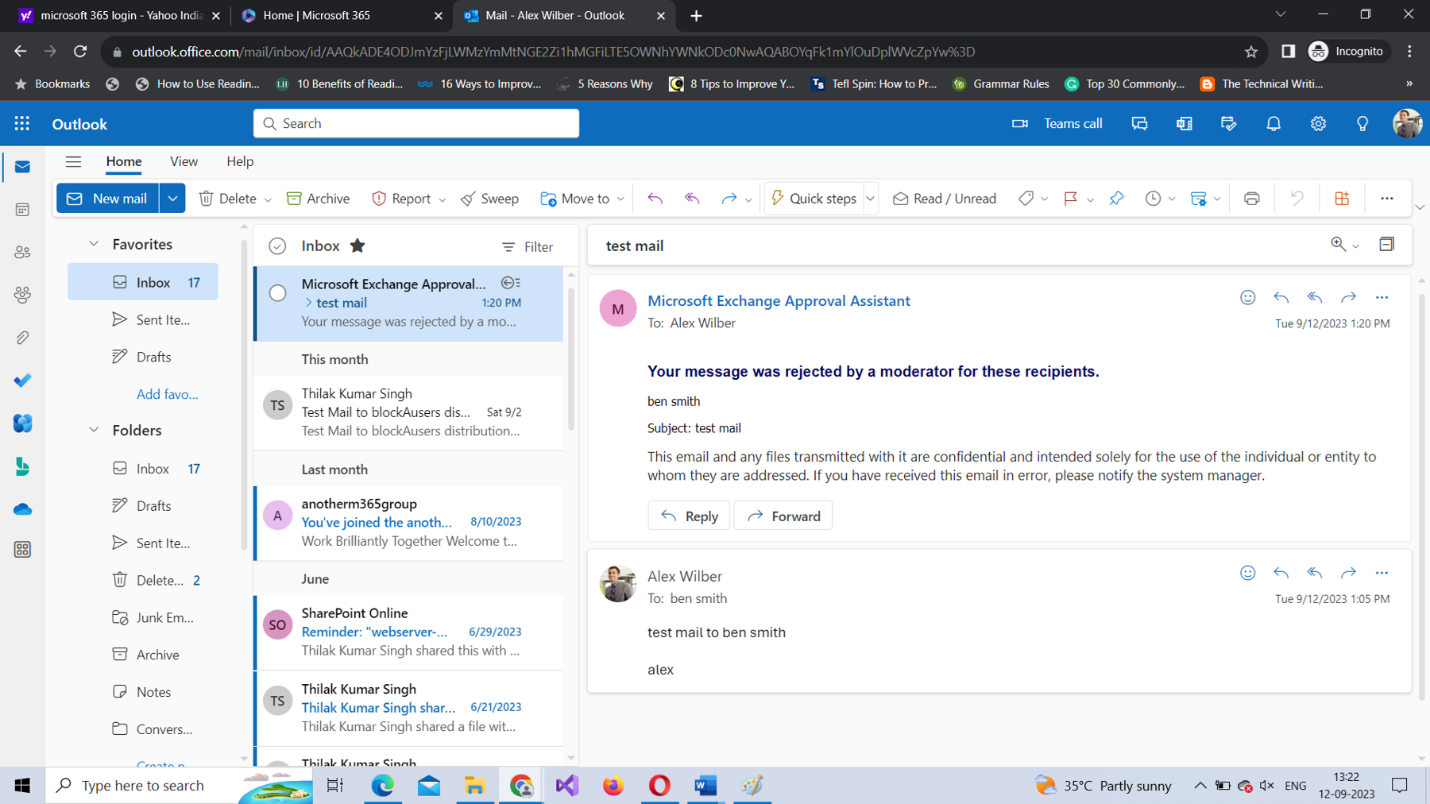
You can choose to approve or reject the mail. If you reject the mail, a notification gets sent to the sender stating that the message was rejected, as shown in Figure 14.
Creating the Same Mail Flow Rule Using PowerShell
To create the same mail flow rule using PowerShell:
- Run your Windows PowerShell as an administrator.
- Connect to Microsoft 365 Exchange Online using the Connect-Exchange cmdlet. Read How to Install and Connect to Microsoft 365 Exchange Online using PowerShell for more info.
- Run the following, as shown in Figure 15: New-TransportRule "test_rule_using_ps" -From amit@contoso.com -ModerateMessageByUser tks@contoso.com

Figure 15: Creating a Microsoft 365 mail flow rule using PowerShell. | Used with permission from Microsoft.
How Does the Script Work?
Let’s break down the script:
- To create the mail flow rule, use the New-TransportRule cmdlet.
- Pass in the name of the rule within double quotes, as shown in Figure 15.
- Set the -From parameter value to amit@contoso.com.
- Set the -ModerateMessageByUser parameter value to tks@contoso.com. To find out whether the rule has been successfully created, run the following command: Get-TransportRule "test_rule_using_ps"
Note: (3) is the condition and (4) is the action. This rule does not have any exceptions.
Use Case 2: Preventing a User from Sending Mail Outside the Organization
Another common rule you may have to implement is preventing trainees from sending mail outside the organization. Since you now know the makings of a mail flow rule, we’ll just show you a snapshot of the conditions and action needed to create such a rule using Figure 16.
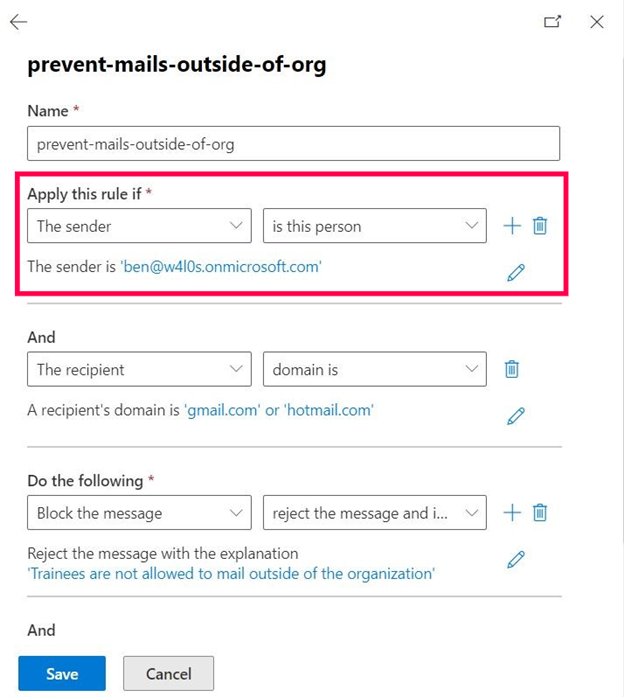
Note: We are targeting a single user only for demo purposes. You probably will have to add all your trainees into a separate group and create a rule that prevents the entire group from sending mail outside the organization.
As you can see, the rule prevents a user named Ben from sending emails to users of popular mail services like Gmail and Hotmail. The rule uses two conditions (the sender has to be Ben and the recipient has to be a Gmail or Hotmail user) and one action (that of blocking the mail and including the reason for blocking the mail to its sender) without any exceptions.
Testing Whether the Mail Flow Rule Works
Once you are done configuring the rule and enabling it, you can test it:
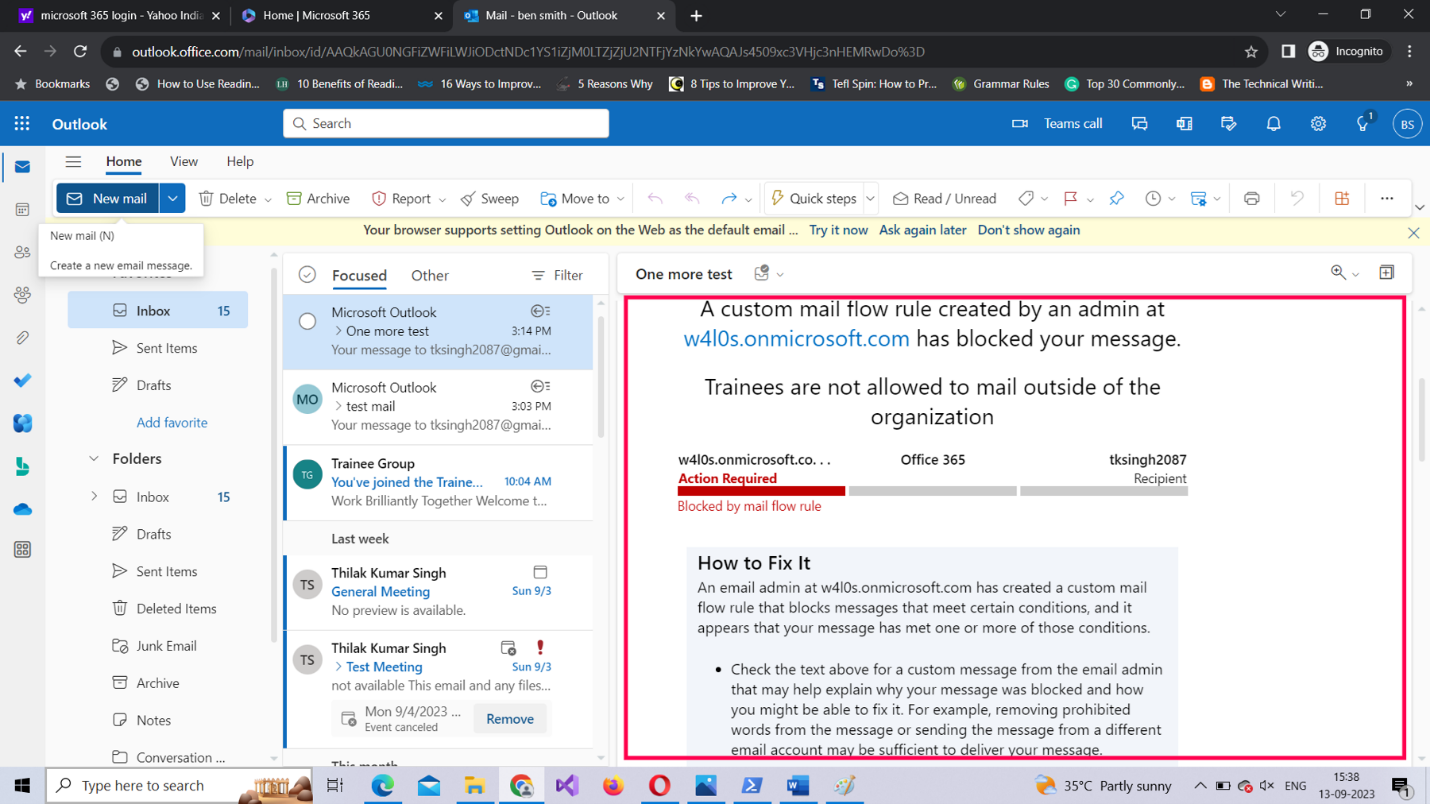
Sign in with the sender account and try sending a mail using Outlook on the web to a Gmail or Hotmail user. Wait for a while. The user should get an auto-generated mail stating that Trainees are not allowed to mail outside of the organization, as shown in Figure 17.
Creating the Same Mail Flow Rule Using PowerShell
To create the same mail flow rule using Windows PowerShell:
- Run your Windows PowerShell as an administrator.
- Connect to Microsoft 365 Exchange Online using the Connect-Exchange cmdlet. For more information, Read How to Install and Connect to Microsoft 365 Exchange Online using PowerShell.
- Run the New-TransportRule "Prevents users from mailing outsiders" -From samantha@contoso.com -RecipientDomainIs “gmail.com”, “hotmail.com” -RejectMessageReasonText “Trainees are not allowed to mail outside of the org” as shown in Figure 18.

How Does the Script Work?
Let’s break down the script:
- To create the mail flow rule, use the New-TransportRule cmdlet
- Pass in the name of the rule within double quotes.
- Set the -From parameter value to samantha@contoso.com.
- Set the -RecipientDomainIs parameter values to "gmail.com", "hotmail.com"
- Set the -RejectMessageReasonText parameter value to "Trainees are not allowed to mail outside of the org".
- You can run the Get-TransportRule "Prevents user from mailing outsiders" command to find out whether the rule has been successfully created.
Note: (3) and (4) are the conditions and (5) is the action. This rule does not have any exceptions.
Possible Errors You Might Face
Here are some possible errors you might face and ways to rectify them:
- Whitespace in your mail flow rule’s name: Ensure you name your mail rules without any whitespace between them, since this can throw errors. Remember that whitespace causes errors only when you are creating your rules using the EAC, not when you are using PowerShell.
- Typos in your message header and message header value: Ensure you get the message header and its value right. You should enter them exactly as indicated in this article. If not, you won’t be able to save/run your rule successfully.
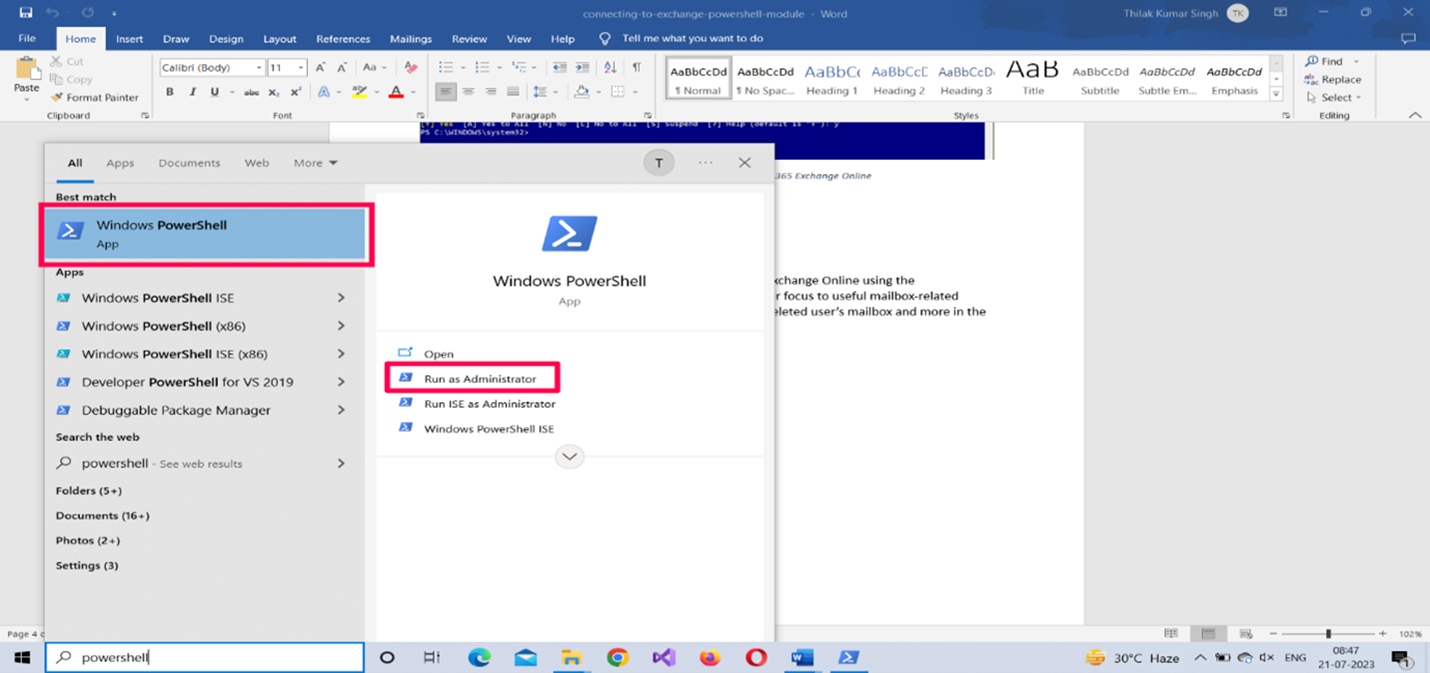
- Not running your shell as administrator: Select the PowerShell program from the Windows start menu and choose Run as administrator, as shown in Figure 19.
- Execution Policy set to restricted mode: Execution policy setting determines the script execution rights for the current user. If you are signing in for the first time, chances are this is set to ‘restricted’ mode. Ensure the execution policy is set to RemoteSigned (which allows you to execute your scripts) by running the Set-ExecutionPolicy RemoteSigned command.
- Typos in your PowerShell script: You can run into typos even while copying/pasting scripts. So, it’s best to save your scripts in separate .ps1 files and run them. This not only saves time but also prevents your script from running into unnecessary errors.
Note: To check your current script execution rights, run the Get-ExecutionPolicy command.
Conclusion
We have explained how to create mail flow rules from scratch and given two use cases. In the next article, we’ll dive deep into mail flow rules and explore a few more use cases to help you manage your user emails efficiently. These include directly sending meeting details to attendee calendars and setting a meeting response as accepted by default to avoid unnecessary meeting-related notifications.
Did You Know? Managing Microsoft 365 applications is even easier with automation. Try our Graph PowerShell scripts to automate tasks like generating reports, cleaning up inactive Teams, or assigning licenses efficiently.
Ready to get the most out of Microsoft 365 tools? Explore our free Microsoft 365 administration tools to simplify your administrative tasks and boost productivity.